Categories
Ubuntu

Ubuntu Touch on the Nexus 7 (2013)

I tried Ubuntu for devices — once I figured out what I was doing wrong (you have to flash your device to complete stock and wipe it beforehand), the install went pretty well.

The system is beautiful.  The way to navigate through the UI is beautiful as well.  You swipe from the right to switch between apps.  You swipe up from the bottom very lightly to access the app’s context menu. You swipe from the top to access your notification panel, and you swipe from the left to access a quick launch menu of apps.

However… there aren’t many apps to speak of yet, and the ones that are there are mostly web frames.

Categories
Android Programming

Unlocking/Rooting the HTC One on Linux

I recently bought a used HTC One that I intend on using on Ting — it’s a phone I’ve been wanting to use for about a year. It’s one of the nicest Android phones, with hardware quality approaching that of an iPhone. (Not to mention a software skin much more “professional” looking than a lot of other Android hardware manufacturers out there.)

HTC One Dimensions Picture
Isn’t it beautiful?

I didn’t want to flash or even necessarily root my HTC One, however, the only way to restore some apps (like the Google Authenticator) require rooting, so I had to do it.  What’s strange is that most tutorials and utilities I’ve found are for Windows (like this one from theunlockr) — I guess it shouldn’t be too surprising, considering most PC’s are Windows, but I’d figure that there would at least be some tutorials for Linux, considering Android’s origins.

Well, the good thing is that unlocking/rooting your HTC One on Linux isn’t really that hard at all, if you’re comfortable with the command-line, and familiar with using the android sdk tools (fastboot, etc.).

I’m not going to go into how to set up the Android sdk, etc, since if you’re doing something like manually unlocking your bootloader, you should already be familiar with it!

Unlocking/Rooting Your HTC One (M7) on Linux

Prerequisites:

  • android sdk
  • htcdev.com account
  • Latest recovery .img file from CWM
  • Superuser Hack .zip file: SuperSU (make sure and get whatever is the latest version of the SuperSU flashable zip — earlier versions found in other tutorials no longer work to root the later versions of Sense)

Unlock Bootloader

  • Boot into bootloader and select Fastboot
  • Run command “fastboot oem get_identifier_token”
  • Copy token as explained on the htcdev page, and await your Unlock_code.bin file in email
  • Copy Unlock_code.bin file to your working directory in Linux
  • Run command “fastboot flash unlocktoken Unlock_code.bin”
  • Follow prompts on screen to unlock/reset your phone

Flash Recovery

  • Boot into bootloader and select Fastboot
  • Run command “fastboot flash recovery <recovery.img>” (replace with .img file downloaded from CWM site)
  • Reboot

Root

  • Copy SuperSU .zip file to phone’s internal memory
  • Reboot into recovery
  • Flash SuperSU .zip file
  • Reboot and enjoy
Other Useful Links
Categories
Life Linux Ubuntu

Converting Your Existing Ubuntu Installation Into a VirtualBox Virtual Machine

Update for 2018: some of the commands have been changed  below to reflect new  possibilities present in Ubuntu 18.04, namely the excellent losetup command.)

I often find myself in the position of having to transfer all my files, applications, and other configurations that make my laptop “mine” onto a new laptop.

What’s so strange about that, you might add? Well, I go through all of this once every six months.  It’s not that I keep buying new computers — I don’t.  But I often obtain them in other ways — I trade, I help someone buy a new computer and in turn get their old one, etc.

So, tired of having to constantly re-install everything (or, at the very least, if I’ve imaged one laptop to another, having to spend a week or so having to get everything running just right), I decided to just convert my current main computer into a VM that I could just run on any computer, running any sort of OS that’s enough to run VirtualBox.

(This tutorial was created with VirtualBox in mind, but other VM’s have similar ways of converting the final file after you get to about step 3 or so.)

It seems like it should be easy, and after a little bit of work, I found out that it’s not too hard.

  1. First, you’ve got to make an image of your current installation.  (This is much easier if you have your entire Ubuntu install on one partition, i.e., no /home partitions on another hard drive or partition.  You can probably figure out how to manage that, but this tutorial will be just for one-partition installs).
    • Boot your computer with another startup disk (CD, jump drive, whatever), and then perform the following command:
      • dd if=/dev/sda1 of=image.bin
    • “/dev/sda1” refers to the partition name that your main install is on — you can find this by doing a “sudo blkid” or “sudo fdisk -l”
    • “image.bin” refers to the output file that the image will be contained in — this can be anywhere you want, but set it to a location that’s not on the hard drive you’re trying to image.
  2. At this point, I tried to turn the image.bin file into a .vdi file so that VirtualBox could use it for a virtual machine — the problem is, at this point, your .bin file is just a partition, and not a real “virtual” hard drive.  There’s no partition table, etc. — you have to simulate these things.
    • You do this by creation an empty “sparse image” where we’ll copy the image, simulating a hard disk, and then create a partition table:
      • dd if=/dev/zero of=newhd.img bs=1G count=0 seek=100
      • In this, “newhd.img”represents the location of the file we’re creating, and “100” represents the size of the virtual hard drive we’re creating, in gigabytes.  You may want to make this larger or smaller depending on the image you made.
    • Now, edit the image with “fdisk newhd.img“, and, following the commands presented in the fdisk interface, create a new partition table, and create a partition as large as the image you created. (The commands inside fdisk are pretty self-explanatory.)
    • Now, make the partitions available as individual devices to your system.
      • sudo kpartx -a newhd.img
    • Now, copy the original .bin file you made in step 1 onto the newly mounted partition:
      • sudo cp image.bin /dev/mapper/loop0p1
    • Now, run a disk check, and expand the copied partition to fill all of the available space, and then finally close the mounted partitions:
      • sudo e2fsck -f /dev/mapper/loop0p1
      • sudo resize2fs /dev/mapper/loop0p1
      • sudo kpartx -d newhd.img
  3. At this point, you should have a newhd.img file, which represents the entire hard drive you’ll virtually mount in your VM — the only step left is to convert it from a raw image of a hard drive into a .vdi file for use in VirtualBox:
    • VBoxManage convertfromraw -format VDI newhd.img newhd.vdi

The only steps left at this point are to create your new VM in VirtualBox, and then start it using this HD.  It more than likely won’t boot, so what you’ll need to do is start it with a livecd of your choice, and then fix the boot (I used the wonderful boot-repair utility available to Ubuntu).


Sources:

https://unix.stackexchange.com/questions/41137/convert-image-of-a-partition-into-image-of-a-disk-with-partition-table

https://superuser.com/questions/554862/how-to-convert-img-to-usable-virtualbox-format

https://askubuntu.com/questions/69363/mount-single-partition-from-image-of-entire-disk-device

Categories
Life

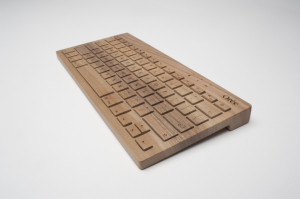
Oree Carved Wooden Wireless Keyboard

For some very impractical, inexplicable reason, I want this, or would at least like to buy it as a present for someone.  I just have no idea who.Oree Wooden Wireless Keyboard

http://www.theverge.com/2013/7/5/4494966/oree-wooden-keyboard-gets-pop-up-tokyo-workshop

Categories
Book Reviews Life Reviews

Review: Titanicus

Titanicus
Titanicus by Dan Abnett
My rating: 4 of 5 stars

Not a bad tale of the Adeptus Mechanicus — there aren’t too many books in the 40k universe written about them, though they’re a huge part of the lore of this literary universe (standing quite a bit higher than the Astartes in the hierarchy of how things are run in the Imperium of Man).

Titanicus deals with some of the usual things you might expect to find in a book about the Mechanicus — the politics of human-augmentation in a society that seeks species purity, the way the masses see the Mechanius as distant, aloof, etc — and some of things you would rather not see explored too far, like the relationship between the God-Emperor of man (a being exalted as a living/dead god who sits on a golden throne on the Earth) and the Omnissiah (the being who the Mechanicus are allowed to worship simply because everyone has decided to look the other way and just claim that it’s obviously another avatar of the God-Emperor).

View all my reviews

Categories
Life

Spidey the Cat.

image

Categories
Android

Android 4.3 Radios for Sprint Galaxy Nexus

Can’t update your Sprint Galaxy Nexus to Android 4.3, but want to enjoy the new radios (which actually do improve signal strength a good bit)?

Tried to download the 4.3 update but it just won’t install on your Galaxy Nexus?  (Maybe you’ve rooted, hacked away at something — I’m not judging.)

Well, I can confirm that this link below works great to flash just the radios.

xda-developers – View Single Post – [ROM][AOSP][4.3.1][JLS36I] OFFICIAL CyanogenMod 10.2 Nightlies.

Categories
Book Reviews Life Reviews

Review: Smoke and Mirrors

Smoke and Mirrors
Smoke and Mirrors by Neil Gaiman
My rating: 4 of 5 stars

Well — I had never read anything by Mr. Neil Gaiman before, but had always heard his name repeated everywhere. And… I was pleasantly surprised. Weird writing, but really great.

View all my reviews

Categories
Book Reviews Life Reviews

Review: Small Gods

Small Gods
Small Gods by Terry Pratchett
My rating: 3 of 5 stars

Not bad — I’d never read anything by Terry Pratchett before this. I like his style of writing, and the ideas brought up here and there in the book regarding religion are thought-provoking.

Sadly enough — because I really wanted to really like this book — I’ve never been a fan of the “all satire/funny” style of writing. Give me some Heinlein (with the witty banter of his characters) or something more modern like John Scalzi (who’s a LOT like Heinlein in how he writes) and I’m fine, but the type of writing in Small Gods (or something similar like the Hitchhiker’s Guide to the Galaxy) just bothers me. I’ve never liked it.

Maybe when you try for the joke-a-minute style of writing that sometimes it can’t help but seem forced, or the jokes kind of just start losing their funniness after a litle while (I had that problem with Hitchiker’s Guide — near the beginning, I’m literally laughing out loud while reading, and about 2/3 of the way in, I’m like okay, get on with the story).

View all my reviews

Categories
Hardware Linux Science and Technology Ubuntu

HP Pavilion Touchpad Not Working (you need to “kick” it)

So, for about two days the touchpad on my HP laptop stopped working.  Of course it was right after a kernel update in Ubuntu, so I immediately blame that.  You know… because 9/10 times it is.

So, I’m checking and checking things but can’t find anything.  It’s weird.  It’s not like it’s not working correctly, or is misconfigured — it’s like Ubuntu, which is actually pretty good at picking up on hardware changes today, can’t even see it.  So on a hunch I reboot into Windows, but it’s not working there either.

So now, instead of having to tromp through the utterly useless Ubuntu forums (full of unresolved issues where people complain about some update or the other breaking something), I can now expand my search to various HP Windows forums. Where in about five minutes, I found this gem.

Apparently, on some HP laptops (or maybe all laptop hardware is set up like this, I’d honestly never encountered it before), you have to perform what’s called a “kick”:

  1. Turn off your laptop.
  2. Unplug your AC adapter.
  3. Take out your battery. (If you can’t take out your battery externally, time to pull out a screwdriver and start taking your laptop apart.)
  4. Hold down the power button on your laptop for at least 30 seconds, preferably more (just to make sure, since time is a relative construct perceived differently by all sentient forms of matter).
  5. Put in your battery, and turn back on.  Your touchpad should now be visible to your OS, be it Ubuntu or Windows, again.

Why or how this works is anyone’s guess.  I think it resets the BIOS (it seemed to do a strange double boot the first time plugging it in after performing this procedure, which is similar to what happens on a BIOS upgrade).  I’m just glad it does.